Showing posts with label tutorial. Show all posts

Monday, 12 August 2013

HAIR: Four Ways To Tie Off A Braid


So last week I should you three different ways you could do your hair using only the three strand braid. This week I decided to do another simple post about braids, but this time I am going to give you four different ways to keep your braid in place. These will work on any type of braid, not just the three strand, and  are fairly simple to pull off.


The first option is probably the hardest to do at first, but is really simple once you know what you are doing. It's organic, which means that all you need is your hair. This also means that it is the perfect hairstyle for if you are in class and you want to put your hair up but can't get your hands on an elastic. The first step is kind of tricky to explain. You have to braid just a bit different than what you are used to to achieve the effect. When you are braiding your hair, instead of separating the bottom of the braid (you know how the ends get stuck together), leave it and braid as far as you can go. Once you can't go any further, your fingers will end up making a hole where the next braid should have been. You have to take the ends of the braid and flip it through the hole to create a little knot that will keep the braid in place all day. The braid might be a little shorter than what you are used to, but still looks super cute!

This is probably my favourite way to tie off a braid. It is so simple and looks really unique, especially with small accent braids. All you have to do to recreate this undone look is tease the ends of the braid and spray it with hairspray. It is super duper easy and can be done really quickly.

This one is a cute look but requires a little more time than the others. All you need is a few bobby pins. I suggest you get them in your hair color, I just used black to show what they looked like. You will need to take a piece of your hair, and wrap it around the end of the braid. You could also use an elastic and wrap the hair around that to ensure that the braid stays put. Then just in the hair in the back. You may need to use several pins if your hair won't stay flat. You can conceal the bobby pins better than I did by pinning up instead of down like I did.

Last but not least, I decided to throw in the classic, easy braid-ending technique that everyone knows. It is extremely basic, but effective and pretty much everyone ties off their braid using the ponytail.

So those are my four, well more like three and a picture, ways to keep your braid in place. What is your favourite way to keep your braid in place? Do you have any others?
XOXO,
Taylor


Friday, 9 August 2013

DIY: Lip Scrub


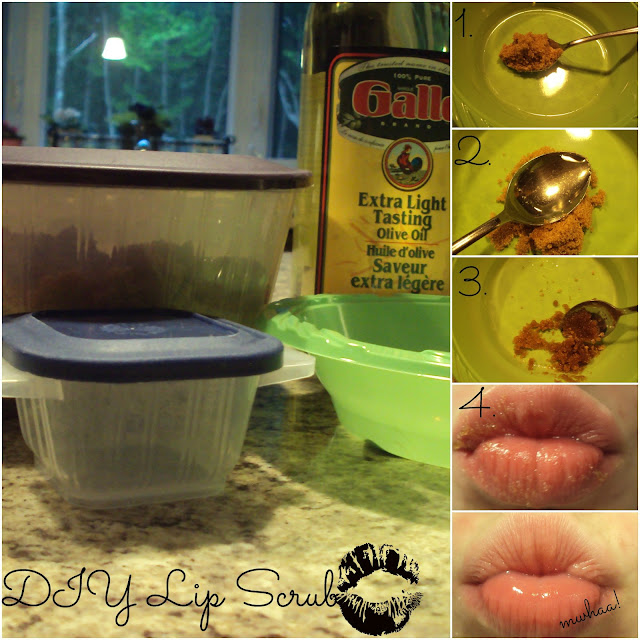
If I wrote out a complete list of all of the things I love it would take forever, but two things that would be on the list are saving money and soft lips so when I came across this DIY Lip Scrub with only two ingredients I got really excited and had to try it. It was super easy, and worked well so I decided to share it with you!

What You Need:

Olive Oil
Brown or White Sugar
A Spoon
A Bowl
A Container (for if you made too much)

What You Need To Do:
First get all of the things you need together.
Then, take your spoon and put some brown sugar in a bowl. The amount of brown sugar should be the size of the amount of lip scrub you want to make.
After the brown sugar is in the bowl, take an equal amount of olive oil and mix it in with the brown sugar.
Once it is completely mixed, apply it to your lips using your fingers.
Rub it in for about a minute and then wash the scrub off.

I know there are several different ways to make your 0wn lip scrub, but I thought this one looked the easiest. You could also add honey to the mix if you have some, but unfortunately I didn't. 

Let me know how this works for you and is there any other lip scrub recipes you like?
XOXO,
Taylor

Wednesday, 7 August 2013

HAIR: 3 Braided Styles That Use Only The 3 Strand Braid

With all of the complicated hairstyles that are going around (like this one and this one), I was thinking where are all the simple three-strand braids? So I came up with three different hairstyles that only use the three-strand technique, perfect for anyone that doesn't really know how to do other types of braids. These hairstyles can be used on any type of hair, and I am pretty sure the first two can be used on shorter hair, with a little bit of modification.

This first hairstyle is just a headband made out of your own hair!
  1. Start with hair. You can find it on your head. Any type of hair will work.
  2. Separate a section of hair between 1 and 2 inches from the rest. I like to take it from behind my ear, because it will sit at the perfect place on my hair. I also like to tie the rest of my hair away, so it doesn't get mixed up in the braid. 
  3. Start braiding the section. A helpful tip: Start braiding upwards, to wear you want the braid to be when you make it a headband. This will prevent large bumps from appearing.
  4. Continue to braid your hair. You do not need to braid it upwards the whole time because this will make your arms hurt.
  5. Tie off the braid.
  6. Place the braid where you want it to be in the headband. Then, so nobody sees the bobby pin you are going to secure it with, lift up a section of hair from where the bobby pin will sit. 
  7. Pin the braid down with a bobby pin, then put the hair you held up back down. Smooth everything out so it looks AH-MAZING!
And then you're done!


If you thought the first hairstyle was easy, this will be even easier. 
  1. Again, start with hair. 
  2. Take a section of hair about an inch or two wide, and begin braiding. You do not need to braid it up or do anything fancy, just braid it.
  3. Then tie it off.
  4. Finally, and this step is optional, you can thicken up the braid, by pulling on the outsides of the braid. This will make it look more full, but you can leave it un-pulled if you want to.
Then you are done, honey-bun.


This hairstyle is kind of like braid-ception.
  1. Again, you need hair to do this hairstyle.
  2. Separate the hair into three sections. Be sure to use all of your hair.
  3. Tie off two of the three sections. I decided to keep the middle section, but it doesn't really matter. If you have layers, it might be harder to use the back piece, since it is a side braid.
  4. You are now going to separate the section into smaller, inch-size sections (or whatever size you want) and braid them (like the peekaboo braid).
  5. Then tie the braid off and pull on it to make it thicker.
  6. Complete steps 4. and 5. until you do not have any hair from the section left.
  7. Let down the rest of your hair.
  8. Braid all of your hair together, using the braids as one section. Then tie it off.
And that's it!


So those are the simple hairstyles that you can do if you only know how to do a three-strand braid. These are also perfect for days that you need to do a quick easy hairstyle because they all have less than ten steps. 

Three-strand braids are the easiest, but what are the hardest braid for you?
XOXO,
Taylor


Wednesday, 31 July 2013

HAIR: How To Use A Sock Bun When You Don't Really Know How To Use A Sock Bun

If you have seen a YouTube video on how to use a sock bun, you've seen how effortless and easy it looks. If you have tried to use a sock bun you know that it is difficult. I have tried using a sock, I have tried using the donut, but I just can't seem to master the sock bun look. I'd like to blame the layers in my hair, but deep down I know that I just can't do it. So I have come up with a way to use the donut, perfect for the person who:
 a) just can't do it the normal person way
 b) has layers
or c) is just sick of doing the regular sock bun


All you need for this look is a hair donut, some elastics, and some bobby pins. I got my hair donut here, but they are sold at a variety of places, and you can also make one yourself out of a sock. I used two elastics and six bobby pins, but the number of pins you use will vary on your hair type (mine is on the thicker side).

1. The first thing you need to do is put your hair into a ponytail. Wherever you put the ponytail is where your bun is going to be. I like mine at the top of my head, but you could also do this look for a side bun or a low bun.

2. After you have your ponytail you need to slide the hair donut/ sock/whatever you are using over top of the ponytail. It will kind of look like a giant scruchie-type thing. All it needs to do is sit there at the base of your ponytail.

3. and 4. The next step is to spread your hair out evenly all around the donut. I find it easiest if I tilt my head then spread the hair around with my hands. It is important to hide the donut, especially if it is a different color than your hair.

5. After the donut is completely hidden, you need to keep it that way using another elastic.

6. You can leave your hair like that if you really want to, but I don't so I need to put the ends of my hair up around the bun, which also helps hide the elastic. You can do this in a variety of ways, (twisting, braiding, fishtailing, etc.) but I decided to simply take a piece of hair, wrap it around the base of the bun, and pin it with a bobby pin.

7. Just continue the technique you used to pin the hair up until all the hair is either in the bun or around it, and you are done!

This is my easiest method to create a full looking bun and would definitely suggest trying it out if your donut is just sitting somewhere collecting dust because you don't know how to use it.

How do you use your donut/sock/whatever? Can you do it the right way (and would you like to explain to me all of the secrets to doing so?)
XOXO,
Taylor


Friday, 19 July 2013

NAILS: On The Dot


Polka Dots seem to always been in style. The 20's. 30's, 40's, 50's, 60's, on bathing suits, dresses, or blouses, the dot trend just never goes away- not that I want it to. They are back in for Summer 2013, and in one of my favourite ways- nail art! Creating the perfect dot can be hard, but a tool called the nail dotter can help make it a little easier. Here are the steps to getting polka dotted nails with a nail dotter.

What You Need:
A Nail Dotter (or bobby pin/straight pin if you don't have one)
A Clear Coat (I used this, in Grand Central Station)
Two Colors Of Your Choice ( I used white and blue*)
*The blue was called Blue Escape but is no longer avalible.

1.Start with clean nails that have no polish on them.

2. Put on a base coat to prevent your nails from turning yellow. I just used my clear coat.

3. Paint all of your nails your main color, except your ring finger (the one beside the pinky.). This will be an accent nail, and if you don't like the way it looks, you can just paint it like the rest of the fingers. My main color was blue.

4. Paint your accent nail your second color. If you do not want an accent nail, skip this step and just paint your ring finger the main color. My accent color was white.

5. Let your nails dry. If your colors are not dark enough, add a second coat.

6. Once your nails are dry, pour a little bit of your accent color onto a piece of paper or a napkin.

7. Take your nail dotter and dip it into the nail polish. Then dab the dotter onto your nails to make a dot. Continue to make dots onto your nail at random, then do the same for every nail except the accent nail.

8. After all the dots (except for the ones on the accent nail) are done, pour a little of your main color onto the same paper or napkin that you used for the first set of dots. Make sure the color from the previous dots is off of the dotter, then take it and start making dots on the accent nail using your main color.

9. Once the nails are all dry, put a clear coat over top of the nails to help keep the polish on for longer.

My two favorite patterns are polka dots and chevron. What patterns or designs are yours?
XOXO,
Taylor

P.S. I wrote a post for another blog about BB Creams which you can check out here.

Wednesday, 17 July 2013

HAIR: Waving The Magic Wand


This post is all about curling your hair with a curling wand instead of a curling iron. Some people are scared of using the wand because they do not want to be burnt- but with a little practice you can master the curling wand and never get a burn...unless you are prone to doing clumsy things. Like grabbing the wrong end of the wand. True story. I personally prefer the wand over the regular curling iron with a clamp-even after I have burnt myself- because I find it easier to use and doesn't not leave indents on my hair. Anyways, here are the steps to curling your hair with a wand.

What You Need:
Heat Protector (I used this one.)
Hairspray (This one.)
Curling Wand (I used this one with the 32mm straight barrel but I also recommend this one.)

1. Protect your hair from damage caused by the heat by spraying in a heat protector before blow drying or curling your hair. The instructions on the back of the bottle will tell you when the best time to spray it is. The Aussie Heat Protecting Shine Spray suggests to spray it in your hair while damp.

2. Dry your hair before curling. If you curled your hair while wet it would damage it and also wouldn't hold the curl. You can either blow dry it or if you have time let it air dry.

3. Section your hair in half, one section on each side of your head, then section it again so you have a top and bottom piece on each side. Pin the top piece out of your way for now. If you have thicker hair, you might want to make more than two sections on each side.

4. Separate about an inch of hair from the section. This is the first piece of hair you will be curling. Make sure that the curling iron is on, and at a temperature you feel comfortable using. A higher temperature is better for thicker hair and a low temperature is best for thin hair.

5. Curl the piece by wrapping it around the barrel. I find that the best curls are made when you wrap the hair away from your face and when the wand is pointed downward. The size of the curl will depend on the size of the barrel. For example, this barrel is big so it will make waves or loose curls instead of tight ringlets. I keep my hair wrapped around the wand for a little under 15 seconds, but that amount of time will not work for everyone. You need to be careful about not keeping it on too long,  or this could happen.

6. Continue separating pieces and curling them (steps 4 and 5) until you are finished the section.

7. Spray your hair with your favourite hairspray to help the curls hold after you are done the section. Take down the top section and repeat the process of separating, curling, and spraying.

8. Finish by repeating steps 4-7 on the opposite, uncurled side. Spray your hair one last time with hairspray is a good idea to keep the curls for longer, and flipping your head upside down while spraying will increase the volume of your curls.


Which do you prefer the wand or the iron?
XOXO,
Taylor